RAW Workflow for Gigapixel Macro Images
For the vast majority of gigapixel macro imaging, jpg photos and 8-bit workflows are perfectly acceptable, and we ship the Magnify2 configured that way. But what when jpg doesn’t fit the bill? Sometimes we need a RAW workflow for gigapixel macro images.
That’s what this blog article is about.
First, some background: jpg files are inherently 8 bits ‘deep’, which means, simplistically, that each can represent 255 different shades. Think of it as the Crayola set you had when you were small. The first set only has a few colors, but as you got more adept, you probably got a bigger set that more crayons and a range of shades for each color. RAW files have a much deeper bit depth, usually 12 to 14, depending on the camera nowadays, and hence can represent more shades and colors – like having the much larger Crayola set.
So if it’s better, why don’t we use RAW files all the time?
Here are the cons to RAW:
- The photos are MUCH larger. RAW files are about 28MB and we then convert to 16-bit TIFF (about 107 MB) versus 8-bit JPG which is about 4 – 6MB
- Storage requirements are much heavier – and not just for the initial photographs. This effect is a multiplied as you go through the workflow and end up with duplicated photographs AND 16 bit TIFF images
- More processing steps (and additional software) required. You have to convert the RAW sensor data to pixels before starting processing
- Stacking and stitching 16-bit images is much slower.
So given these challenges why use a RAW workflow?
- Photographs need to be edited before stack and stitch for any reason
- The need to work with extended dynamic range
- Absolute color fidelity is needed
- Preserve options for future processing – you know that processing options in future will be better that the tools available today
- You want to photograph in the most versatile form and produce the absolute best quality image you can.
When any of these benefits is required, the best route is to use a RAW workflow, so how do we go about it?
Step 1 – Capture.
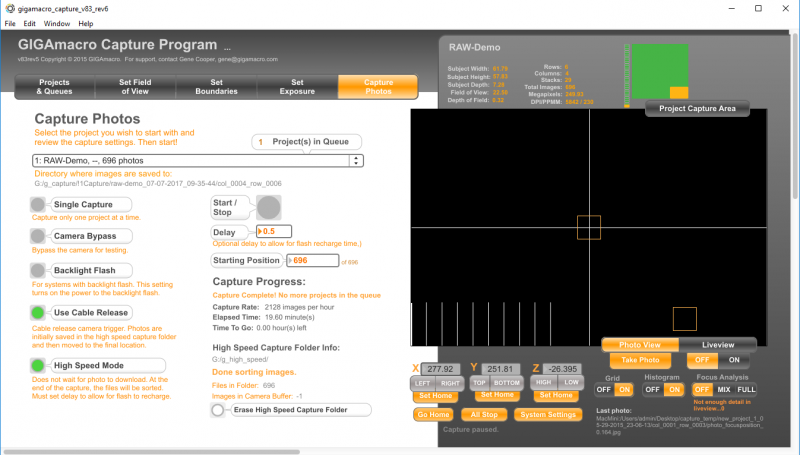
Set the ‘Size/Quality’ setting in DSLR Remote Pro to ‘Raw’. Do NOT choose ‘Raw/Fine’ or any other combination of Raw and jpg. Set up your Project in the normal way, the only slight change is to expose to the right a little more than one would when shooting jpg.
That means allowing the exposure to be a little closer to the right edge of the histogram than one would when shooting jpg files. We do this as RAW files have much more latitude than JPG files do.
You should also set a short delay .3 – .5 seconds in the ‘Delay’ box in the ‘Capture Pictures’ tab. This is because RAW files are MUCH larger and hence take longer to download and save on the computer.
NB Don’t forget to change the settings back when the capture is done!
Step 2 – Initial Processing.
This is an additional step required to convert the RAW file (with a file extension of .CR2) from sensor data into pixels that we can start to work on. You will need a software tool to do this and I recommend Adobe Lightroom. As well as being an excellent way to make changes to photos (and one of Lightrooms big plusses for me is the ability to change one image’s attribute – e.g. exposure or color temperature – and have ALL photos have exactly the same change applied) the biggest reason I use Lightroom is that it will convert the RAW files into TIFF and put them in the same folder as the original. This fact alone makes the processing much simpler – as you know a Project has within it a folder for each XY position that in turn contains the stack of photos for focus stacking. So we want the same structure, with a set of TIFF files so that we can use the same workflow from here, with just a few parameter changes.
One BIG caveat. Lightroom is a powerful and sophisticated program and can work wonders. It also gives you the power to mess up, so ensure that you have comprehensive backups BEFORE you start any processing. This is the embarrassed voice of experience speaking…..
Importing Photos into Lightroom
The critical task in importing is to maintain the folder structure of the Project:
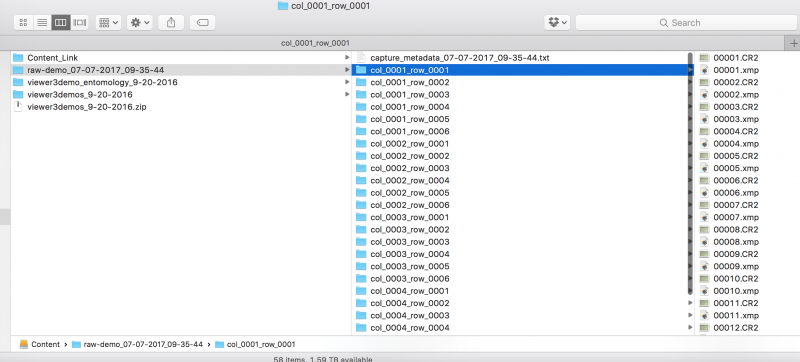
Note the Project folder in the left panel, the XY position folder structure in the center panel and the files themselves in the right panel. Note that there are two files with the same name, but different extensions; .CR2 and .xmp, neither of these will be detected by Zerene so they can stay as is.
To import the .CR2 files into Lightroom, choose the Import button and use the left panel to navigate to the Project folder (in this case raw_demo_….). The photos to be imported will be displayed in the center panel and the CRUCIAL choice is to Add the images (this preserves the directory structure).
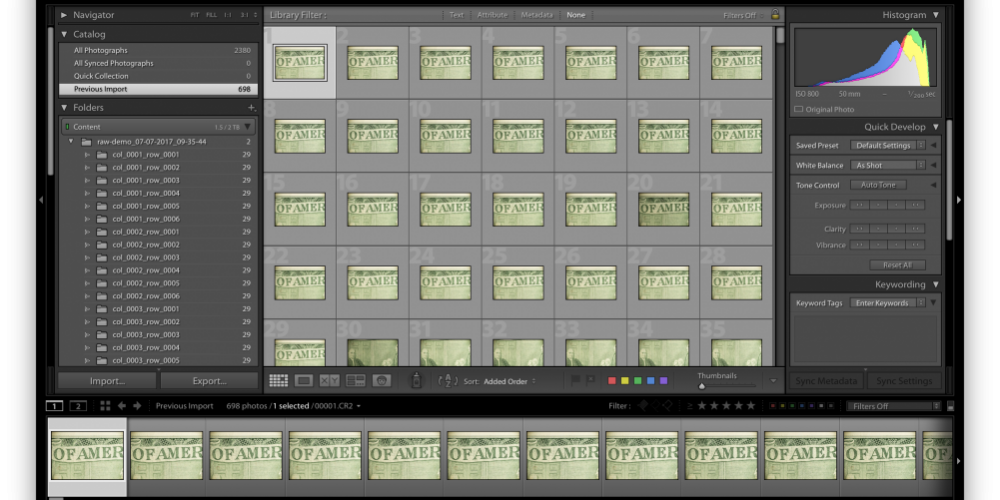
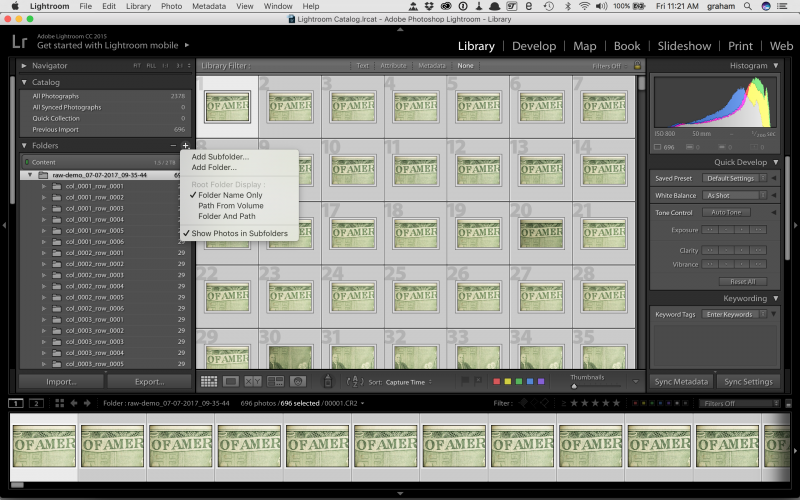
Once the import completes, this can be a lengthy process if you have a large project), you should have something that looks like the image below. Points to note: Check that the folder structure is correctly imported; that each subfolder has the same number of photos and that the total photo count is correct.

Lightroom Library window
Now you should critically assess the photos and if any adjustments are desired go to the Develop module (letter D), check that ‘Auto Sync’ is selected (click the button) and that all images are selected (CMD/CTRL-A). Check that the number at the bottom of the screen ‘xxx photos of / xxx selected’ is the correct total. If you do need to make adjustments, that is beyond the scope of this tutorial, but there are plenty of lessons online – I especially like Julieanne Kost’s videos.
So, once you are satisfied with the photos, next is to export them in TIFF format back to the location of the matching RAW photo. To do this, ensure that you have the Project folder (that is the original parent folder) selected. If you DO NOT see any images in the center panel you need to select the option to display images in subfolders by clicking the ‘+’ sign to the right of ‘Folders’.
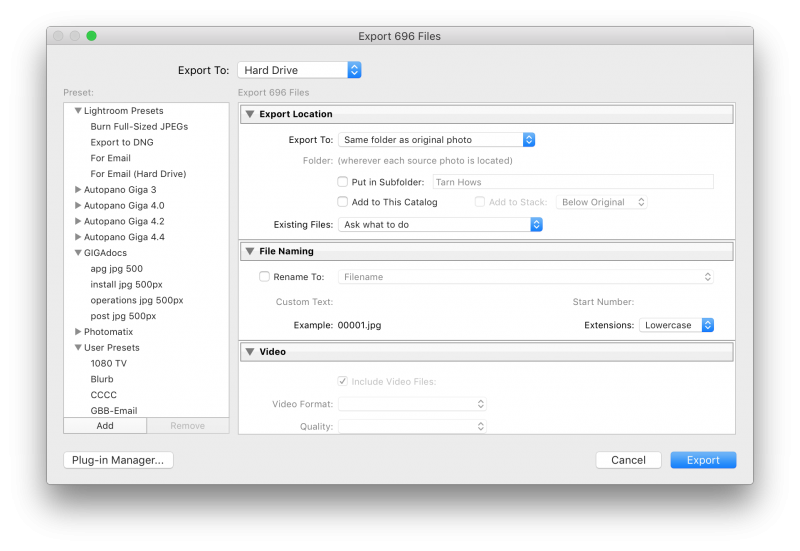
Once again, check that all photos are selected. The choose File > Export and the dialog will pop up. There are a number of boxes in this dialog: the only two that should be used (the others should be cleared) are the ‘Export Location’ which should be set to ‘Same folder as original photo’.
The second part that needs setting up is ‘File Settings’ where you should choose ‘TIFF’ and the format and Adobe RGB as the Color Space.
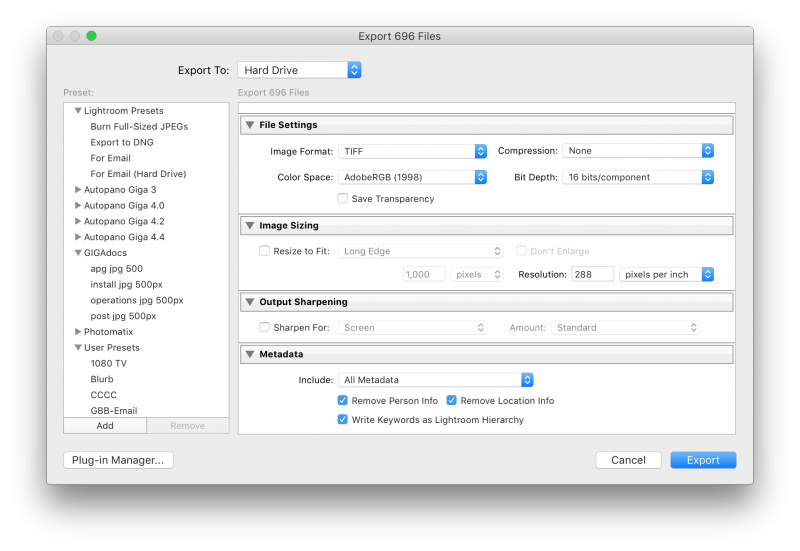 Your settings should look like the two examples above. When you are satisfied that you have selected all images and set the export settings correctly, click the Export button. Lightroom will do its thing – this may take some time – and you will then have a folder structure that has a matching TIFF file for each .CR2 file.
Stacking
Now we go back to our regular workflow and stack the photographs in each folder to give us our composite for stitching. There are a couple of gotchas to be aware of here. Most importantly, the Zerene standard setup is for jpg and 8-bit workflows, so you must change that. To do that open Zerene and choose Options > Preferences. Select ‘Image Saving’ and choose ‘TIFF’ in the drop-down box. Click the radio button ’16 bits RGB’ (do it in that order, even though that is counter-intuitive – Zerene has an odd quirk that means you can’t select 16-bit first). Finally, check that under Color Management’ Adobe RGB is selected.
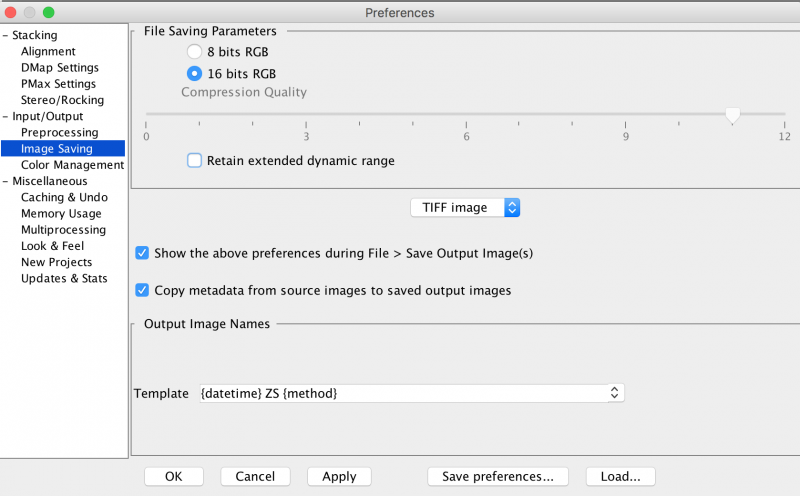
Click Apply and then Click OK. You can now stack your photos in the normal way (see Operations & Workflow User Guide). If you have NOT moved the Project folder from its original location, simply load the batch file. If you HAVE moved the Project folder you will need to build the batch process by hand in an old-fashioned way (see the Operations & Workflow User Guide)!
Don’t forget to RESET the Zerene settings to 8-bit JPG. If you are going to do this RAW workflow regularly, save the 16-bit RAW workflow as a workflow setting and in future you can just load that setup.
The Rest of the Workflow.
From here on, the workflow is exactly as normal, just with larger files, so be prepared for longer processing times. For the meantime, this workflow is a little more complex than the 8-bit flow. GIGAmacro is working on a solution that will help to simplify many aspects of this process – GIGAmacro FLOW. If you are interested in trying that out – it’s beta software – email us. As always, I’d welcome you questions and feedback on this article, or on our systems.
Cheers
[avatar user=”graham” size=”thumbnail” align=”left” link=”https://gigamacro.com/blog/team/graham-bird/” target=”_blank” /]

Graham has worked as a business and marketing leader in high technology, aviation and not-for-profit large and small organizations.
He jumped out of corporate life in 2007 to ‘have more fun’ and does so helping small companies with strategy, business, and marketing as well as traveling and making pictures.
He loves working with smart groups of people to solve challenging problems.
Gadgets of all sorts (especially anything to do with aviation and flight) and photography have fascinated since early childhood. He is also an accomplished photographer who exhibits regularly and a former competition aerobatic pilot.
Graham is a transplanted Brit (hence the humo(u)r) who moved to CA in 1996. Now in Oregon via North Carolina (grandchild chasing)
He is a retired Fellow of the Chartered Institute of Marketing and a Chartered Marketer.
You can find him on LinkedIn please connect with him there.

