This case study examines processes for capturing and exporting 3D data from small low-relief objects. We’re using our GIGAmacro Magnify2 system to capture the images and off the shelf software to process and convert the data into 3D objects. In this example, we’re using a penny as our subject since it is a recognizable subject in terms of size. The penny itself is 19mm in diameter and 1.5mm high.


Overall Results
Using focus stacking plus image stitching can be a powerful method for generating 3D data from small objects. In general, this process would typically be thought of as 2.5D imaging since we are not capturing the entire object in 3D. However, the resulting data is used to create fully 3D objects and data and can be used in 3D printing, milling, and animation software.
The process is ideal for low-relief objects such as a penny, fossil, or historic document. This is especially true for objects that are too small or too reflective for traditional laser scanning techniques. Below are a few advantage and disadvantages to consider.
Advantages:
- Can be used for very small objects (as small as 1mm).
- Can be used for objects that have reflective or uneven surface properties.
- Automatically registers texture information at an extreme level of detail and resolution.
- Ideal for low-relief objects.
- Texture information is extremely high quality.
Disadvantages:
- Can be time-consuming in capture and processing. However, over 90% of the process can be automated using the GIGAmacro Magnify2.
- Not ideal for complex objects with overlapping structures and high relief detail.
- Software for conversion and working with 3D data at high resolutions is still rare.
- Z-depth resolution is limited to how many focal layers you can feasibly capture.
Data Capture
We first captured a matrix of images 13 columns, 23 rows, and 44 focal layers deep. Each focus layer is taken at 28 micron intervals. A total of 13,156 images were captured using our system. While this might seem like a lot, it is an automated process and easily completed by letting the GIGAmacro Magnify2 system run unattended or overnight.
Spatial Data Resolution
The spatial resolution of the final image and data is:
2 microns (width and height)
28 microns (depth)
Or you can also think of it in terms of 54,000 ppi / 2136 pixels per mm (for width and height).
Visual Data
As part of our standard process, we then produce a 2.25 gigapixel (2,250 megapixel) image. The image is created by first stacking the focal layers and then stitching the results into a final seamless image.
Below is an explorable view of the penny and depthmap. Use the opacity slider (bottom, center) to change between the depth map and the visual versions of the penny.
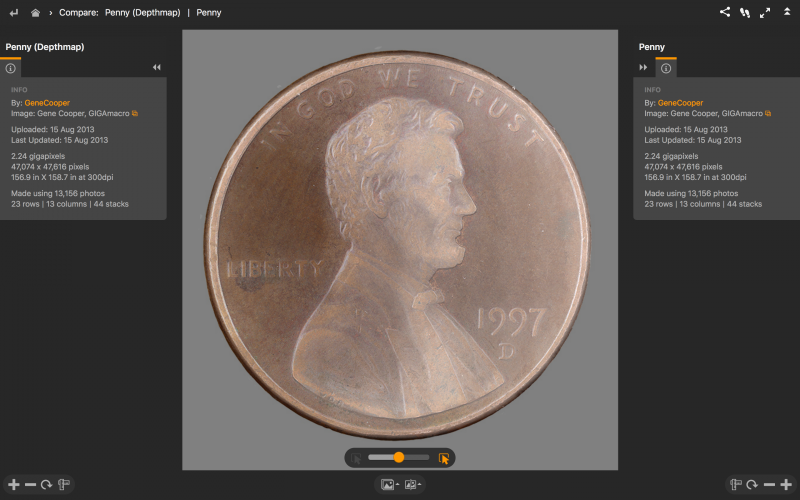 3D Depthmap Data
16-bit depthmaps (or heightmaps) are a byproduct of the focus stacking process. When each focus stack is processed the result is both a visual image (jpg or tiff) and a depthmap (tiff).
The depthmap and visual image are identically aligned and matched to the visual images which means that we can use the visual imagery as a reference image to stitch the depthmaps together. When we stitch the visual images together in Autopano Giga, we load the visual images and depthmaps in as “stacks” paired with each other. Once the visual image is stitched, we can then output both the seamless gigapixel image and a seamless gigapixel depthmap.
The width and height resolution of the depthmap is determined by how many images are stitched together. The z-depth or “depth” data is determined by how many focal layers are captured. In this case, 44 layers were captured at 28 micron intervals. If we capture more layers, then the z-depth resolution would be higher and more detailed in the z axis. It is reasonable to capture over 150 layers and in some cases over 250 layers, but in this example we used a relatively modest number of layers.
Creating a Depthmap from a Single Focus Stack
Zerene Stacker has a depth-map function as does Helicon Focus. Helicon Focus also has tools to work with a single focal stack and then export the 3D data as a depth-map or convert it to a polygonal object such as an obj.

Output from Helicon Focus. (above)
Working with the Depthmap Data
We can easily work with the visual image and use GIGAmacro Viewer to explore and share it. We can also explore and share the depthmap in the same way, but at this point it is still a greyscale image. To convert it to a true 3D format we need do the following:
- Use Photoshop to convert the depthmap into a 3D object.
- Use Mudbox, Rhino, Maya, or other 3D software to convert the depthmap to a 3D object (polygon or NURBS).
- Use a scripted converter to translate the depthmap into a 3D format.
The examples below were produced in Rhino using the Heightfield command. A downsized version of the depthmap was first produced in Photoshop (2048 x 2048 pixels) and then used in the Heightfield command using a parameter of 1024 points x 1024 control points. Higher resolution maps can be converted, but in this case we offer the example of what can be produced using a relatively low-resolution depthmap. The result was then rendered and saved.


Scripts and Tools for Converting Depthmap / Heightmap to 3D Data
Rincey’s Converter
https://github.com/anoved/hmstl#heightmap-to-stl
M Fussi’s Converter
http://adv-geo-research.blogspot.com/2013/10/converting-dems-to-stl-files-for-3d.html
http://www.thingiverse.com/thing:15276/#files
Gene is a creative innovator and developer with a passion for developing scientific tools, exhibits, and educational programs that provide new ways of exploring the world both literally and figuratively.
Photography is a common thread in his life and work, which has come a long way since childhood years experimenting with unique perspectives, angles, filters, and time-lapse exposures.
He founded GIGAmacro to build robotic devices capable of capturing gigapixel photographs with microscopic detail and developing new visualization tools for comparison of complex imagery for research, science, and education.