Batch templates are a powerful tool to digitize multiple similar subjects.
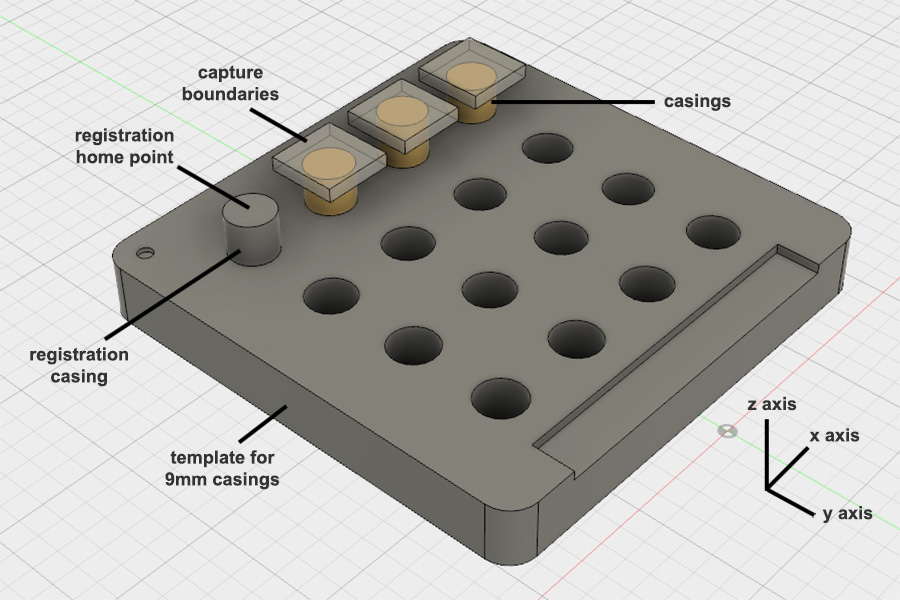
In this example you will learn about using batch templates to digitize a set of 9mm casings for forensic toolmark examination.
The benefit of templates is that many subjects can be photographed in a batch, which allows the Magnify2 to run unattended and do the heavy lifting whilst staff are usefully employed on other tasks.
The same method can be applied to almost any subject, using our components from the GIGAmacro Template System or by making your own.

- Registration Point: a known, predictable, repeatable point on the template that we call “home“; this point can be almost anywhere as long as it consistent and reusable when the template is removed and then re-installed.
- Capture Boundaries: invisible boundaries in each of the x, y, and z axes that define the volume that should be photographed (See illustration above right).
- Template: a physical fixture that holds a set of subjects in a set locations relative to each other
- Software Template: a file that stores the capture boundaries of each specimen or subject relative to the home position; this file also contains additional meta data and pre-defined camera settings.
It’s simple to setup a template.
- Place your subjects in the template and locate it on the imaging surface using the registration pins (or however you locate your home made template). Templates are adapted for a specific type of subject, for example, thin geology sections, 35mm slides, entomology specimen holders, etc.
- Identify the registration home point on your template. Using the GIGAmacro Capture controls, drive the rig so that the home point is in the center of the frame and in sharp focus. Then click the ‘Set Home’ button under each of the X, Y and Z controls. The home position is now set.
- Use GIGAmacro Capture to define the capture boundaries for each subject on the template in turn. You can also manually edit and create a software template.
- As you create the boundaries for each subject, enter in basic meta data info that lets you know the order and position of the subject in the template. Such as subject 1 (row 1, column 1), etc.
- Save the software template (choose Save Queue) in GIGAmacro Capture. If you use the GIGAmacro ‘standard’ data file layout, use !Projects folder for individual projects and !Templates folder inside your data folder
Using a template is even easier.
- Place your subjects in the template. Locate the template on the registration pins.
- Set the home position using GIGAmacro Capture to the registration point for this template. Zero the X, Y and Z axes.
- Load the software template (choose Load Queue).
- Select and update each project in turn to enter the specific meta data for each subject.
- Check your lighting and exposure is as desired.
- Select the first project in the queue and press go!
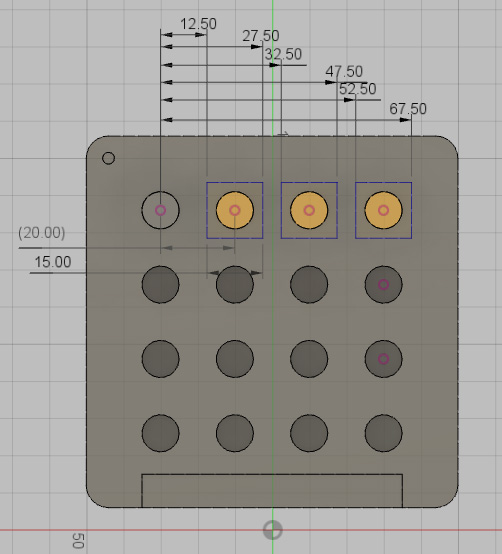
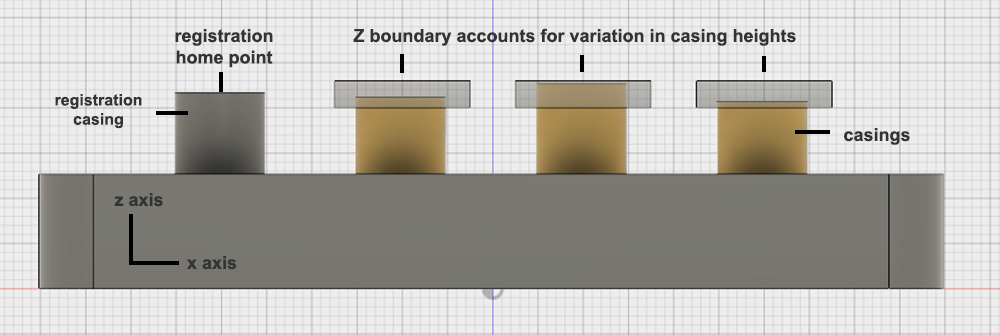
The GIGAmacro Magnify2 uses an XYZ coordinate system. The coordinates for each capture boundary set in a template are always relative to the registration home position. In this example the coordinates of the capture volume for each subject are based on the home position being in the center of the 9mm casing with 20mm spacing between casings, a 15mm capture area for the X and Y. The Z capture height is 2.5mm, which is enough to account for variation between the slightly different heights of each subject. With that knowledge, we know that the capture boundaries are as follows:
| Coordinates | Registration Casing | Subject 1 | Subject 2 | Subject 3 |
| Left (x) | 0 | 12.5 | 32.5 | 52.5 |
| Right (x) | 0 | 27.5 | 47.5 | 67.5 |
| Top (y) | 0 | -7.5 | -7.5 | -7.5 |
| Bottom (y) | 0 | 7.5 | 7.5 | 7.5 |
| High Focus (z) | 0 | 1.25 | 1.25 | 1.25 |
| Low Focus (z) | 0 | -1.25 | -1.25 | -1.25 |

- Account for Variations. When setting captures boundaries, account for small variations in the subject dimensions or placement in the template. This is especially true for the z boundaries when focal stacking. This will result in more photographs in each capture but overall more efficient in terms of time and labor.
- Delete Subjects from Capture Queue if Not Needed. You may not want to capture all the possible locations in a template. In this example, we could photograph up to 15 subjects but are only photographing the top row of 3 specimens. To deal with this, once the software template is loaded into the Capture Queue, just delete the locations that you aren’t using form the queue.
- Test Capture in Bypass Mode Run your capture queue in bypass mode (with liveview on) to check it before starting the queue. You can then see what is going to be captured. If needed, you can adjust any boundaries and update the project.
- Registration Home Point Location Almost any feature can be used as the registration home point as long as it’s possible to locate it precisely in all three axes every time you use the template. It could be a mark on the template holder, the top corner, etc. In this example we used one of the subjects as a registration point which works as long as you use the same specimen and it is precisely positioned and kept as part of the template.

Gene is a creative innovator and developer with a passion for developing scientific tools, exhibits, and educational programs that provide new ways of exploring the world both literally and figuratively.
Photography is a common thread in his life and work, which has come a long way since childhood years experimenting with unique perspectives, angles, filters, and time-lapse exposures.
He founded GIGAmacro to build robotic devices capable of capturing gigapixel photographs with microscopic detail and developing new visualization tools for comparison of complex imagery for research, science, and education.


